
Practical, Monthly Best Practices to Help Users Get the Most Out of Break Analytics
Thomas’ Tips & Tricks is a monthly series designed to help planners get up and running quickly, avoid common setup pitfalls, and unlock the full power of Fin CW’s IRA planning software.
Each tip is short, simple, and immediately actionable. Whether you’re onboarding for the first time or refining your workflow, Thomas shares the best practices he’s learned from supporting users.
With over 20 years of experience across IT, banking, and advisor support, Thomas Evans brings a rare blend of technical expertise, customer service, and real‑world financial industry insight.
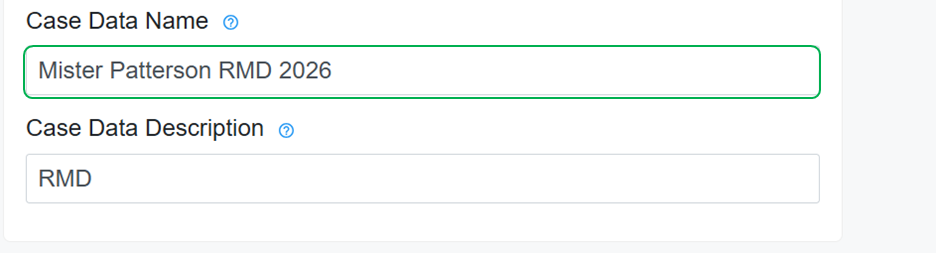
January 2026 Tip: Ever struggled to find a saved case?
Here’s the secret: give your Case Data a clear name.
Why? Because when it saves as a .JSON file on your computer, that Case Data name becomes your shortcut to quick access. No more hunting through random file names—just search for the name you created and get back to work faster! Tip: Name it now, find it later! ✅

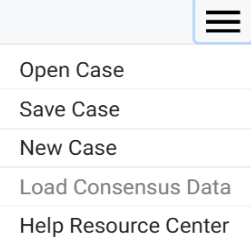
February 2026 Tip: Why you should always click “New Case” before assisting your next client.
Instructions for Starting a New Client Case
1. Save Your Current Client’s Case
Open the Hamburger Menu and select “Save Case.”
- The case will be saved under the name you entered in the “Case Data Name” field on the General form.
2. Start a New Client Case
- After saving, return to the Hamburger Menu and select “New Case” before entering information for your next client.
Why This Matters
Selecting “New Case” clears out all data from the previous client. This prevents any saved information from accidentally carrying over into the next client’s case and helps ensure accuracy, compliance, and clean reporting.
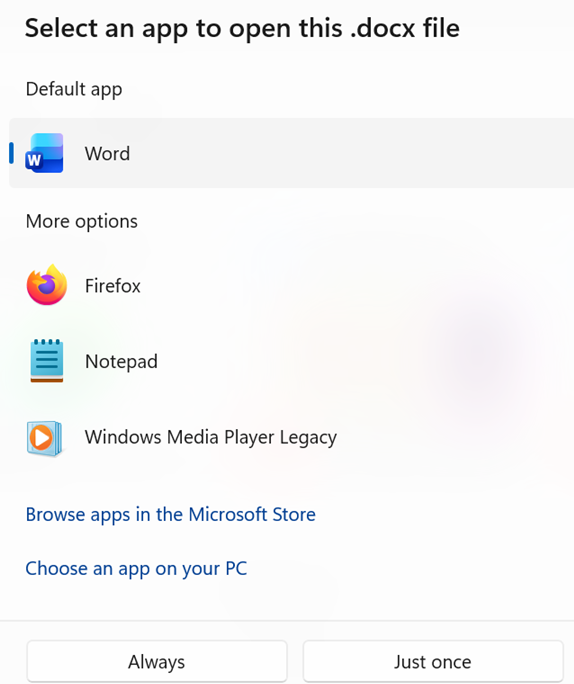
March 2026 Tip: Has your computer ever asked which program to use when opening a saved case?
Our software uses .json files to store and read case data.
If you try to open a saved case and your computer pauses to ask which program to use, it means the default app isn’t set correctly.
To fix this, make sure your web browser—such as Chrome, Edge, or Firefox—is set as the default program for opening .json files.
This ensures your saved cases open in the correct format and prevents display or formatting issues.
Important: If your computer prompts you to choose a program, do NOT select Word, Excel, PDF readers, or similar applications.
These programs cannot read .json data and will make the case file appear unreadable or “broken.”
Case files must stay in their original .json format and should only be opened with programs designed to read .json data—your web browser being the most reliable option.
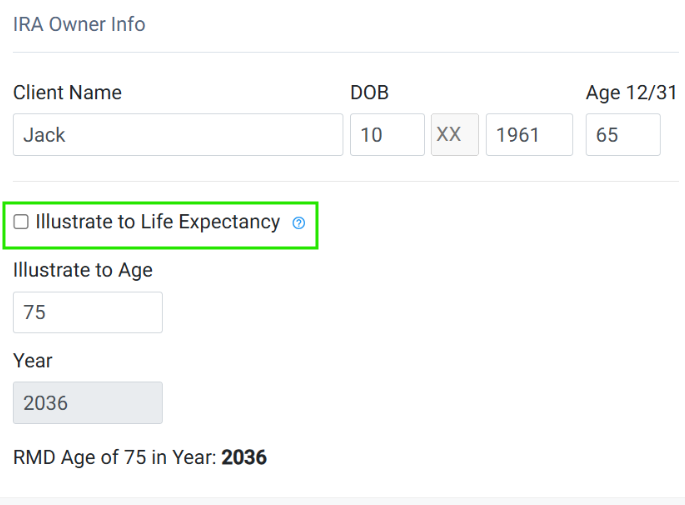
April 2026 Tip: See how to adjust client’s life expectancy
Adjusting LX for Your Scenarios
Illustrate to Life Expectancy is a planning feature used in IRA scenarios that models Required Minimum Distributions (RMDs) or distributions based on a target age (life expectancy) rather than the client’s or spouse’s current age.
Uncheck this box if you want to manually adjust the illustrated age up or down to reflect your planning scenario.
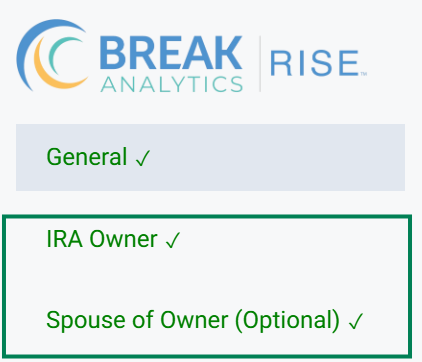
May 2026 Tip: Did you know case data entered once can automatically populate across forms with the same name in different modules?
Understanding Data Flow – Client & Spouse
Certain forms—such as General Information—are used across multiple modules.
Data entered in one module will automatically populate the same information in any other module where that form appears.
What Controls Data Flow?
The second—and in some cases third—tab in the left-hand navigation of each form determines how data flows between modules.
Use these tabs to identify which information will carry over.
Where Client & Spouse Information Flows
Client & Spouse Information Flows to the following forms:
- RMD
- Roth Conversion
- Extended (Stretch) Traditional IRA
- Extended (Stretch) Roth IRA
- SEPP Comparison (Client information only; Spouse data does not flow)
- SEPP RMD Method (Client information only; Spouse data does not flow)
June 2026 Tip: Module Case Data Flow Part 2
Understanding Data Flow – Inherited IRA Modules
Certain forms—such as General Information—are used across multiple modules.
Data entered in one module will automatically populate the same information in any other module where that form appears.
What Controls Data Flow?
The second—and in some cases third—tab in the left-hand navigation of each form determines how data flows between modules.
The image below highlights these shared groupings and the modules connected within each.
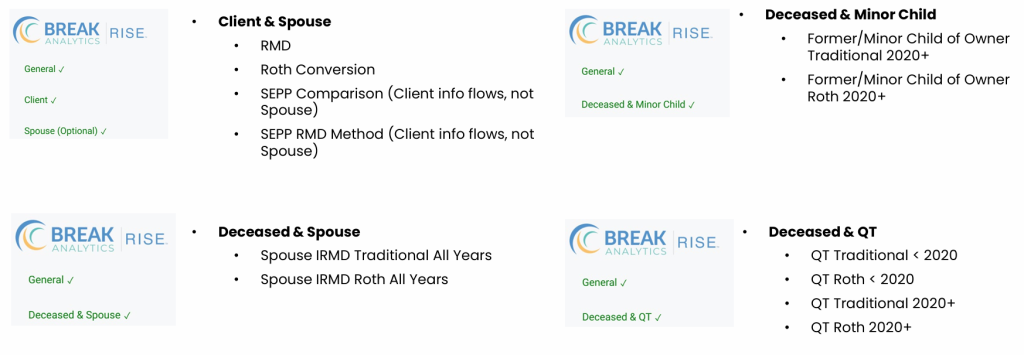
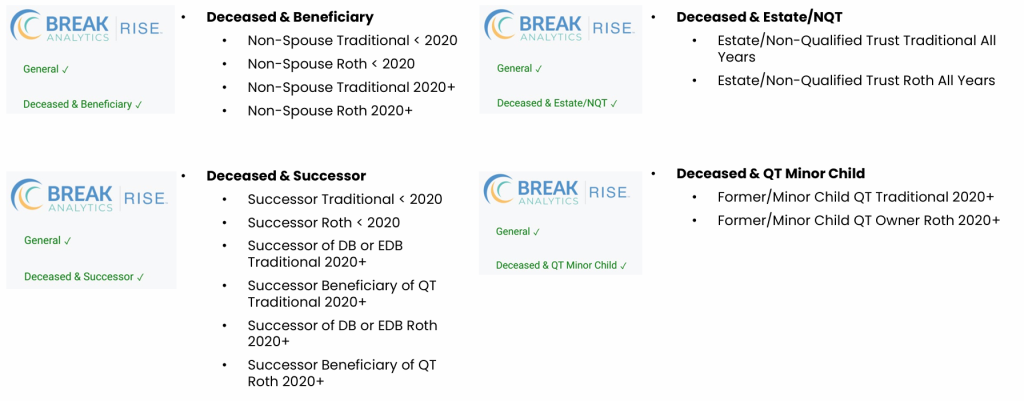
If you prefer to see a deeper dive into data flow, watch Thomas’ breakdown here: Understanding Case Data Flow in the Modules